
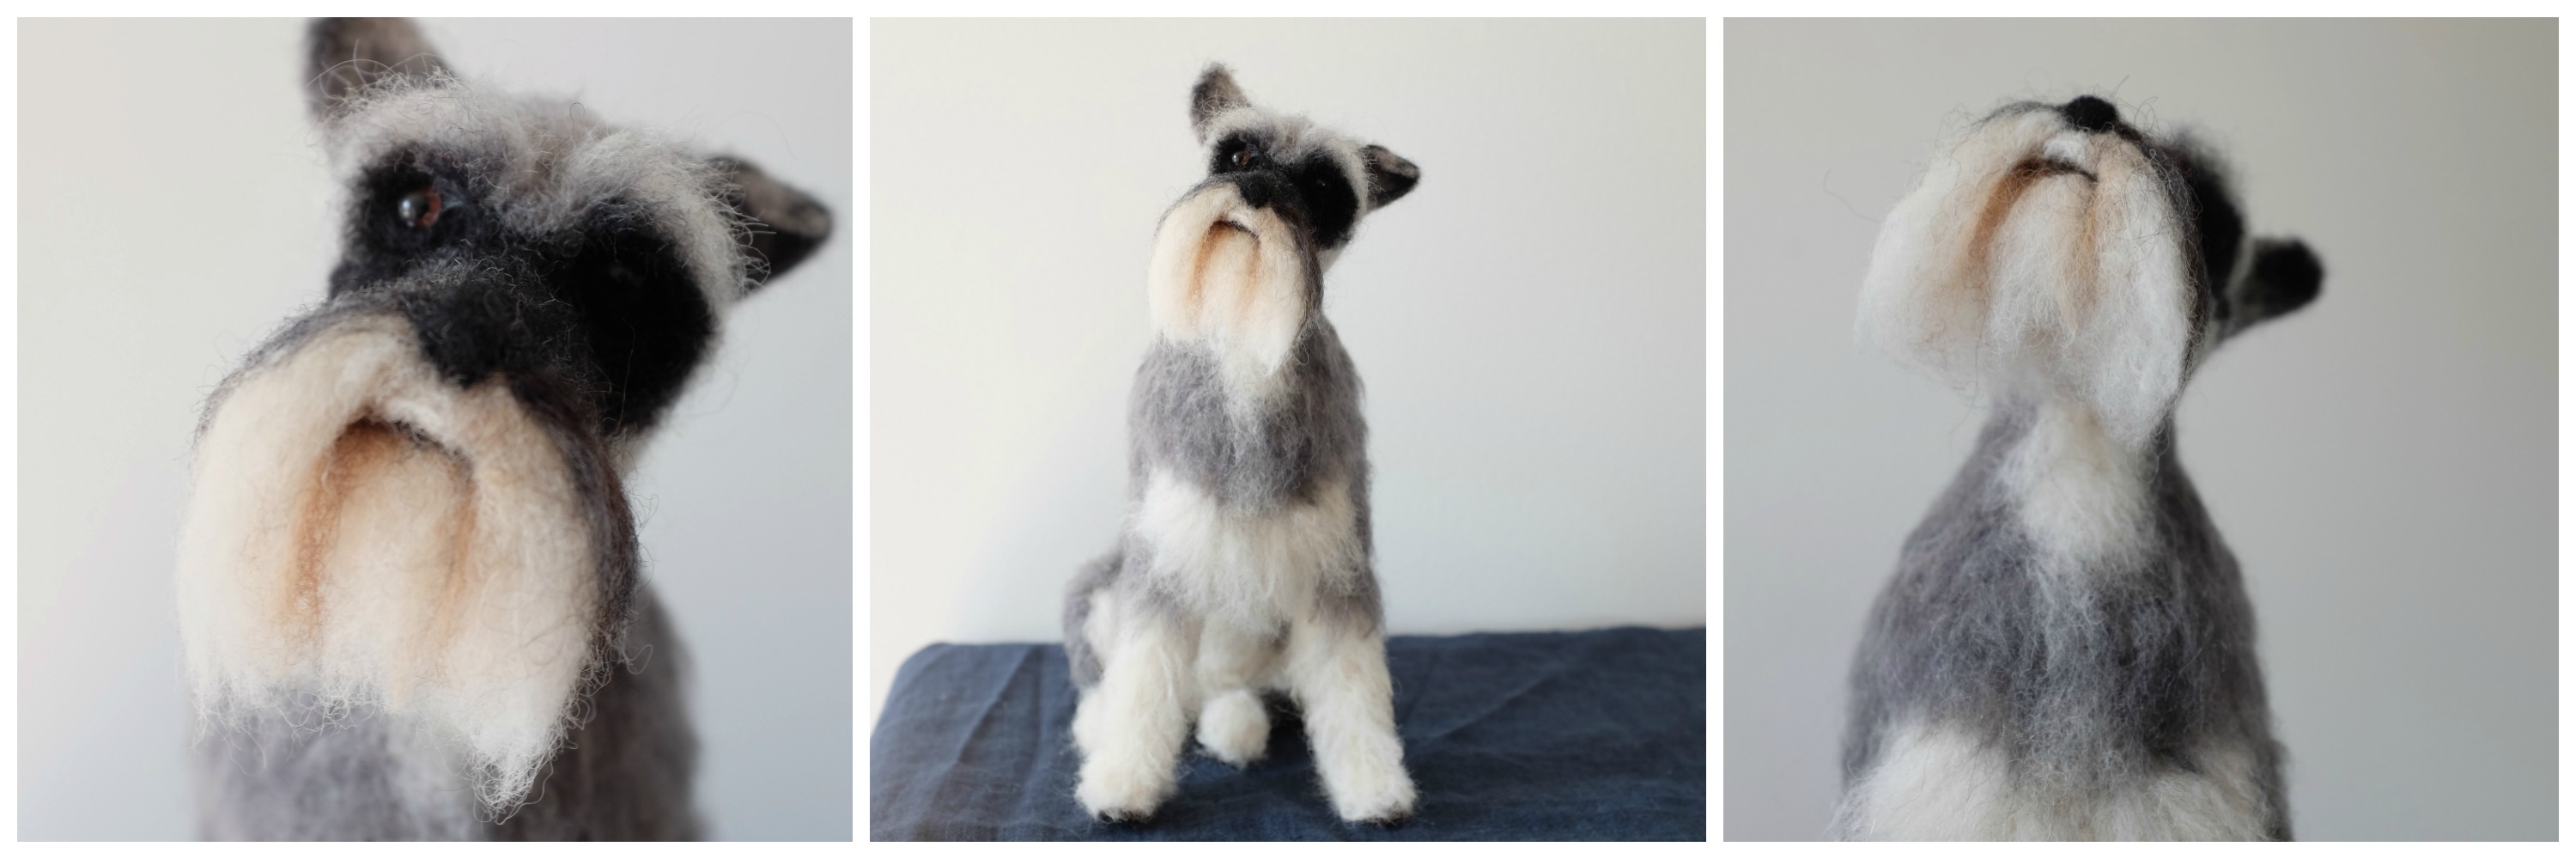
A GREAT BIG Schnauzer
The time's come to go BIG and BOLD. To push your needle felting to the next level of brilliance. And by the end of this you'll be felting like a pro!
I can’t wait for you to get started on this FANTASTIC model!
This is the DOOZY of all needle felt dog models in this series of felt dogs and I’m going to show you exactly how to make it – step by step, no unnecessary fluff [pun ABSOLUTELY intended], just honest tips and plenty of ‘how to’ from me.
Why a Schnauzer?
Because who doesn't loves a Schnauzer?
It’s a go to dog in my needle felting workshops because there’s just so much character that you can add and great techniques that take your needle felting to the next level.
A few reasons you should be hot footing it to the BUY NOW button.
You’ll end up with a model that you’re SO happy with, SO professional, that heck you might just take it up as a full time profession (it's not a bad job to have)

When you felt along with me. I’ll show you EVERY little felting move I know.
Nothing is kept from you and you’ll be learning on the job – so even if you’re new to felting you just need to do what I do.
There are no expectations of experience or skill. This is the same stuff I teach people in person who come to my own workshops - all it needs is patience and the ability to follow what I do.
Each chapter is broken down into easy manageable videos.
NEVER MORE than 20 minutes long. Because you’re going to need to be taking regular breaks which is good for your shoulders, arms and neck (I mention this quite a bit!) and you can pick up easily where you left off.
There are no secrets here!
It’s not difficult when you know how. And this course is full of my own tips and experience of YEARS of making detailed and lifelike needle felt dogs for happy customers – and now it’s my turn to share that with you!
Just so that we are on the same page ...
THIS TUTORIAL IS FOR YOU IF YOU...
It’s never too soon to learn the advanced techniques which you might be putting off.
I’m going to show you how to do everything from start to finish, so that you can learn skills that’ll help you progress your felting to the next level.
Just FYI - while this is a model of a Schnauzer you can easily adapt it to make whatever breed you like. It would translate well into lots of other breeds.
Don’t forget that it’s the techniques in these videos that will help you progress.
And once you have this course – you can download it to keep forever and when you want to progress to a different breed you can follow along and adapt it as you need.
TESTIMONIAL
This is what Elaine from Worcester says about my tutorials
“The tutorials are so great and easy to follow - it's like having Sophie sat next to me! My ability has improved so much and I am confident to tackle much more adventurous projects now"
Thanks Elaine!
WHAT YOU'LL LEARN
I’m not going to lie. This is an investment of your time.
For the love of Schnauzers - it's TEN hours long!
But don’t let that put you off because of the way it’s broken down it’s easy to follow and won’t feel like a slog if you approach it in a sensible way (ie don’t try and do it one sitting).
But it’s worth EVERY minute – even the bit when during the ear video a kids party in the house next door spills out into the street – YES it IS as noisy as you can imagine – but I soldier on! And fortunately it’s only short lived.
So with all that said, and if I haven’t put you off completely yet then it’s time to step up and make this great model.
If you're ready to start making dogs like a pro - then do't wait any longer.
I'll see you on the inside.
Happy Felting!
Sophie
Sophie Wheatley
All Things Felt & Beautiful
www.feltandbeautiful.co.uk
[email protected]
Are you ready to felt?
What order to do things in
The legal bit
INTRODUCTION: A list of wools and tools
FREE PREVIEWINTRODUCTION: Tools to get you started
FREE PREVIEWINTRODUCTION: A detailed look at the coloured wools chosen for the tutorial
INTRODUCTION: Additional colours of wool used
Reference photos to follow
Photos of the final model Schnauzer with dimensions.
Video 1: Bend and cover the first body wire
Video 2: Add wool to shape the body
Video 3: Add weight to the body
Video 4: Final core body shaping
Video 5: Attaching wire for the front legs
Video 6: Covering the wire front legs with wool
Video 7: Attaching the back legs & covering
Video 8: A quick shape up! Adding wool to shape the body
Video 9: Starting on the head
Video 10: Adding shape to the head and face
Video 11: Basic Ears
Video 12: Neck shaping
Video 13: Making a tail
Video 14: The coloured wools we'll be using
Video 15: Adding coloured wool to the head
Video 16: Face detail Part 1
Video 17: Face detail Part 2
Video 18: Face detail Part 3
Video 19: Adding the beard
Video 20: Beard detail Part 1
Video 21: Beard detail Part 2
Video 22: Colouring in the ears Part 1
Video 23: Colouring the ears Part 2
Video 24: Covering the body: the back (part 1)
Video 25: Covering the body: the tummy
Video 26: Covering the body: back legs
Video 27: Front legs Part 1
Video 28: Front legs Part 2
Video 29: Front legs Part 3
Video 30: Adding colour to the tail
Video 31: Adding glass eyes on wire rods
Video 32: Covering the body: the back (part 2)
Video 33: Covering the body: the back (part 3)
Video 34: Covering the chest
Video 35: Adding long hair to the chest
Video 36: Covering the body: the back (part 4)
Video 37: Paw pads
Video 38: Ear accents
Video 39: Extra beard detail
Video 40: Finishing off the legs
A final word from me
You can't put a price on pride. By the end you'll have a professional looking model that you'll love!
£14.99
